Saturday, February 26, 2011

How to create triggers in MYSQL

First of all, before you can create triggers, you should have a privilege to do so. Please contact your database administrator to grant you this privilege.

Once you have the privilege and access to create triggers, next is to know the 3 important terms: trigger_time, trigger_event, and lastly the trigger_body.

trigger_time is the trigger action time. It can be BEFORE or AFTER to indicate that the trigger activates before or after of each trigger event.

trigger_event indicates the kind of statement that activates the trigger. The trigger event can be one of the following:
  • INSERT - The trigger is activated whenever a new row is inserted into the table through INSERT, LOAD DATA, and REPLACE statements.
  • UPDATE - The trigger is activated whenever a row is modified through UPDATE statements.
  • DELETE - The trigger is activated whenever a row is deleted from the table through DELETE and REPLACE statements. Please take note that DROP TABLE and TRUNCATE TABLE statements do NOT activate this trigger, because it doesn't use DELETE.
trigger_event can only be created once per table. Meaning, each table you can create only up to 3 triggers with INSERT, UPDATE, and DELETE event.

trigger_body is the statement to execute when the trigger activates. This is where you put your SQL statements. If you want to execute multiple statements, you should use BEGIN ... END on your SQL syntax, this is likely a normal programming syntax.

Columns are associated with aliases OLD and NEW. The availability of aliases depends on the trigger_event.
  • OLD - can only be use on UPDATE and DELETE event. OLD.column_name
  • NEW - can only be use on INSERT and UPDATE event. NEW.column_name

Example below will create TRIGGER trg_table1_ins that activates BEFORE the insertion happens in table1. We also use DELIMITER to execute multiple lines of SQL statement via MYSQL console.

Let say you have 4 tables: table1, table2, table3, and table4. Each tables has 2 columns: column1 and column2.

delimiter |

CREATE TRIGGER trg_table1_ins BEFORE INSERT ON table1
    FOR EACH ROW BEGIN
        INSERT INTO table2 (column1, column2) VALUES (NEW.column1, NEW.column2);
        DELETE FROM table3 WHERE column1 = NEW.column1;
        UPDATE table4 SET column2 = column2 + 1 WHERE column1 = NEW.column1;
    END;
|

delimiter ;

Since we are using BEFORE as trigger_time and INSERT as trigger_event, the statements between the clause BEGIN and END will be executed before the insertion happens to table1. As a results, table1 will have same data as table 2, records on table3 will be deleted if column1 matches with newly inserted data, and table4 updated its column2 if column1 matches with newly inserted data.

Using BEFORE as your trigger_time will limits you to use AUTO_INCREMENT column, this is because AUTO_INCREMENT will ONLY be generated after you inserted the data. Hence, you should use AFTER. Please see below example.

Let say you have 2 tables: table1 and table5. Each tables have 3 columns: id as AUTO_INCREMENT, column1, and column2.

delimiter |

CREATE TRIGGER trg_table1_ins AFTER INSERT ON table1
    FOR EACH ROW BEGIN
        INSERT INTO table5 (id, column1, column2) VALUES (NEW.id, NEW.column1, NEW.column2);
    END;
|

delimiter ;


Example below will trigger the statement BEFORE the UPDATE happens in table1. You will noticed that I used both NEW and OLD aliases to perform the statements.

delimiter |

CREATE TRIGGER trg_table1_upd BEFORE UPDATE ON table1
    FOR EACH ROW BEGIN
        INSERT INTO table2 (column1, column2) VALUES (NEW.column1, NEW.column2);
        DELETE FROM table3 WHERE column1 = OLD.column1;
        UPDATE table4 SET column2 = NEW.column2 WHERE column1 = OLD.column1;
    END;
|

delimiter ;

Lastly, to have a DELETE event, example below will trigger AFTER the DELETE happens in table1.

delimiter |

CREATE TRIGGER trg_table1_del AFTER DELETE ON table1
    FOR EACH ROW BEGIN
        DELETE FROM table3 WHERE column1 = OLD.column1;
    END;
|

delimiter ;


Tables can be associated with database name which defaults to CURRENT database. Ex. database_name.table_name. You can specify the database name on your trigger_body. This is useful if you wanted to execute your trigger statements on another database. Please see example below.

delimiter |

CREATE TRIGGER trg_table1_ins BEFORE INSERT ON table1
    FOR EACH ROW BEGIN
        INSERT database2.INTO table2 (column1, column2) VALUES (NEW.column1, NEW.column2);
        DELETE FROM database2.table3 WHERE column1 = NEW.column1;
        UPDATE database2.table4 SET column2 = column2 + 1 WHERE column1 = NEW.column1;
    END;
|

delimiter ;


delimiter |

CREATE TRIGGER trg_table1_ins AFTER INSERT ON table1
    FOR EACH ROW BEGIN
        INSERT INTO database2.table5 (id, column1, column2) VALUES (NEW.id, NEW.column1, NEW.column2);
    END;
|

delimiter ;


Hope you like it!!

Resource: dev.mysql.com
Wednesday, February 23, 2011

Exploring Google Static Maps API


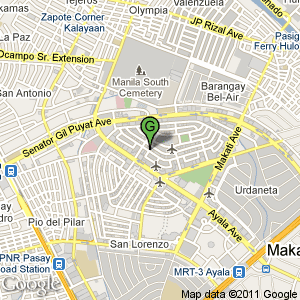
The Google Static Maps API lets you embed a Google Maps image on your webpage without requiring JavaScript or any dynamic page loading. The Google Static Map service creates your map based on URL parameters sent through a standard HTTP request and returns the map as an image you can display on your web page.

The new version Static Maps API v2 will no longer requires a Maps API key which is now open and easy for everybody.

Please see my sample HTTP query string for a Static Map.

http://maps.google.com/maps/api/staticmap?center=14.559041,121.020091&zoom=14&size=300x300&maptype=roadmap&markers=color:blue|label:S|14.559048,121.020095&markers=color:green|label:G|14.559041,121.020091&markers=color:red|color:red|label:C|14.559044,121.020101&sensor=false

URL Parameters:
A Google Static Maps API URL must be of the following form:

http://maps.google.com/maps/api/staticmap?parameter1=value1&parameter2=value2...

Location Parameters:
  • center (required if markers not present) defines the center of the map, equidistant from all edges of the map. This parameter takes a location as either a comma-separated {latitude,longitude} pair (e.g. "14.559041,121.020091") or a string address (e.g. "city hall, new york, ny") identifying a unique location on the face of the earth. For more information, see Specifying Locations for more information.
  • zoom (required if markers not present) defines the zoom level of the map, which determines the magnification level of the map. This parameter takes a numerical value corresponding to the zoom level of the region desired. For more information, see Zoom Levels for more information.

Map Parameters:
  • size (required) defines the rectangular dimensions of the map image. This parameter takes a string of the form valuexvalue where horizontal pixels are denoted first while vertical pixels are denoted second. For example, 500x400 defines a map 500 pixels wide by 400 pixels high. If you create a static map that is 100 pixels wide or smaller, the "Powered by Google" logo is automatically reduced in size.
  • format (optional) defines the format of the resulting image. By default, the Static Maps API creates PNG images. There are several possible formats including GIF, JPEG and PNG types. Which format you use depends on how you intend to present the image. JPEG typically provides greater compression, while GIF and PNG provide greater detail. For more information, see Image Formats.
  • maptype (optional) defines the type of map to construct. There are several possible maptype values, including roadmap, satellite, hybrid, and terrain. For more information, see Static Maps API Maptypes for more information.
  • language (optional) defines the language to use for display of labels on map tiles. Note that this parameter is only supported for some country tiles; if the specific language requested is not supported for the tile set, then the default language for that tile set will be used.

Feature Parameters:
  • markers (optional) define one or more markers to attach to the image at specified locations. This parameter takes a single marker definition with parameters separated by the pipe character (|). Multiple markers may be placed within the same markers parameter as long as they exhibit the same style; you may add additional markers of differing styles by adding additional markers parameters. Note that if you supply markers for a map, you do not need to specify the (normally required) center and zoom parameters. For more information, see Static Map Markers for more information.
  • path (optional) defines a single path of two or more connected points to overlay on the image at specified locations. This parameter takes a string of point definitions separated by the pipe character "|". You may supply additional paths by adding additional path parameters. Note that if you supply a path for a map, you do not need to specify the (normally required) center and zoom parameters. For more information, see Static Map Paths for more information.
  • visible (optional) specifies one or more locations that should remain visible on the map, though no markers or other indicators will be displayed. Use this parameter to ensure that certain features or map locations are shown on the static map.
  • style (optional) defines a custom style to alter the presentation of a specific feature (road, park, etc.) of the map. This parameter takes feature and element arguments identifying the features to select and a set of style operations to apply to that selection. You may supply multiple styles by adding additional style parameters. For more information, see Styled Maps for more information.

Reporting Parameters:
  • sensor (required) specifies whether the application requesting the static map is using a sensor to determine the user's location. This parameter is required for all static map requests. For more information, see Denoting Sensor Usage for more information.

Resource: code.google.com

Sunday, February 20, 2011

How to jailbreak iPad using Greenpoison on Mac.

Greenpoison is one of the latest hacks to jailbreak your iPad to iOS 4.2.1.This article will give you the step by step instructions to do so. Some important points before continuing are mentioned below.

You should jailbreak your iPad at your own risk and it may void your warranty.

Make sure your iPad is updated to at least iOS 4.1 if not iOS 4.2.1.

Make sure to keep your iPad secure after you have jailbroken. Tips to do so are mentioned in the Safety tips article on iPad.net.

These set of instructions are only for Mac users. A windows guide will also be available soon.

It is recommended you perform jailbreaking on a clean restore. If you face problems and you haven’t restored, you can try doing this.

So once you are ready, it’s time to Jailbreak your iPad!

1. Go to the greenpoison website www.greenpois0n.com and download the latest version of greenpoison. It should ideally read as greenpois0n RC5_b3.

2. Once you have downloaded it, click on the zip file and extract the files. Double click on the greenpoison icon to launch the application. The application will open.

3. Connect your iPad to your computer and then switch the iPad off.

4. On the greenpoison application click on the Jailbreak button.

5. You need to get your iPad into the DFU mode. The instructions will be mentioned on the application.

6. First, hold the sleep button for a period of 3 seconds.

7. Then keep holding the sleep/wake button and then press and hold the home button for 10 seconds.

8. Instructions on the application will change based on whether you are doing it correctly.

9. Once the 10 seconds have passed, the instructions will tell you to release the sleep/wake button but continue holding the home button.

10. Once the iPad enters the DFU mode- the jailbreaking process will begin. Make sure you do not release the home button.

11. After the process gets completed you will be told to leave the home button.

12. Then click on the complete button which closes the application. Also, you will see a verbose mode of scrolling on your iPad to indicate the completion of the process.

13. After this your iPad will reboot. Once the iPad switches back on, you will see a new app called as "Loader" on the home screen.

14. Tap on this app and then select Cydia. Install Cydia by tapping on the Cydia button.

15. Once Cydia is installed you may wish to uninstall the Loader application since it is not longer required.

Voila! Your iPad is now jailbroken. Reboot you iPad, then open Cydia and download the latest updates, app and customising options.

Welcome to the wonderful world of Jailbreaking! Enjoy!

Resource: www.ipad.net

Saturday, February 19, 2011

How to make a form post request in PHP using CURL

You can do form post by using CURL in PHP.

As stated below function do_post_request(), you only have 2 parameters to pass on which is $post_url and $post_data. The $post_url is the form action URL where to post the data and the $post_data are the input parameters or data to be posted in a form.

For the $post_data, parameters are delimited by ampersand "&" like query string. Ex. username=...&password=...

This is very simple but very powerful which can really help you doing a back-end processing.

Please see below for the sample POST request.

<?

$post_url = 'http://www.example.com/post-here.php';
$post_data = 'username=myusername&password=mypassword';

do_post_request($post_url, $post_data);

function do_post_request($post_url, $post_data)
{
        $ch = curl_init();
        curl_setopt($ch, CURLOPT_URL, "$post_url");
        curl_setopt($ch, CURLOPT_POSTFIELDS, "$post_data");
        curl_setopt($ch, CURLOPT_POST, 1);
        curl_setopt($ch, CURLOPT_HEADER, 0);
        curl_setopt($ch, CURLOPT_FOLLOWLOCATION, 1);
        curl_setopt($ch, CURLOPT_RETURNTRANSFER, 1);
        curl_setopt($ch, CURLOPT_SSL_VERIFYHOST, 0);
        curl_setopt($ch, CURLOPT_SSL_VERIFYPEER, 0);
        curl_setopt($ch, CURLOPT_USERAGENT, "Mozilla/5.0 (Windows; U; Windows NT 5.1; en-US; rv:1.8.1.3) Gecko/20070309 Firefox/2.0.0.3");
        $response = curl_exec($ch);

        return $response;
}

?>

Tuesday, February 15, 2011

How to post tweet using OAuth access Token in PERL

OAuth access Token was gain from my previous post - How to exchange requested Token for an access Token from Twitter in PERL

In posting a tweet, we will use the resource URL - http://api.twitter.com/1/statuses/update.json and the POST method.

Just follow the steps below to post tweet on users behalf.

1. Install the following libraries.
  • LWP::UserAgent
  • HTTP::Cookies
  • Digest::MD5
  • Digest::SHA
  • POSIX

2. Initialize the libraries.

require LWP::UserAgent;

use HTTP::Cookies;

use Digest::MD5 qw(md5 md5_hex md5_base64);
use Digest::SHA qw(sha1 sha1_hex sha1_base64 hmac_sha1 hmac_sha1_hex hmac_sha1_base64);

use POSIX qw(strftime);

my $lwpua = LWP::UserAgent->new;

3. Setup the UserAgent and HTTP header with the name "Authorization" equal to "OAuth".

my $uagent = "Mozilla/5.0 (Windows; U; Windows NT 5.1; en-US; rv:1.8.0.6) Gecko/20060728 Firefox/1.5.0.6";
my @header = ('Referer' => 'https://api.twitter.com/',
             'User-Agent' => $uagent,
             'Authorization' => 'OAuth');

4. Build the signature base and signing key. Please take note that some parameters should be URL Encoded, see the post for the PERL function that you can use - URLENCODE sub function in PERL.

You need the consumer key and secret which was generated by Twitter upon registration.

You also need the Oauth Token and Secret which you get when exchanging the requested token for an access token.

To generate NONCE, we use Digest::MD5::md5_base64() passing the localtime(). We do it twice to make it much UNIQUE.

Timestamp was generated by using POSIX::strftime() with date format UNIXTIME as "%s".

Signing key was generated by combining the 2 parameters: Consumer Secret and OAuth Token Secret delimited by ampersand "&"

my $strToken = "<your oauth access token>";
my $strSecret = "<your oauth access token secret>";
my $strStatus = "<your tweet>";

my $post_url = "http://api.twitter.com/1/statuses/update.json";
my $nonce = md5_base64(localtime()).md5_base64(localtime());
my $timestamp = strftime('%s', localtime);
my $method = "HMAC-SHA1";
my $version = "1.0";
my $consumer_key = "<your consumer key generated upon registration>";
my $consumer_secret = "<your consumer secret generated upon registration>";

my $post_urlenc = &urlencode($post_url);
my $status_enc = &urlencode($strStatus);

my $oauth_data = "oauth_consumer_key=$consumer_key&oauth_nonce=$nonce&oauth_signature_method=$method&oauth_timestamp=$timestamp&oauth_token=$strToken&oauth_version=$version&status=$status_enc";
my $oauth_dataenc = &urlencode($oauth_data);

my $sign_base = "POST&".$post_urlenc."&".$oauth_dataenc;
my $sign_key = $consumer_secret."&".$strSecret;

5. Generate the OAuth Signature using HMAC-SHA1 method.

my $oauth_sign = hmac_sha1_base64($sign_base, $sign_key)."=";

6. Post an OAuth request with all the parameters you passed on step #4.

my $response = $lwpua->post($post_url,
                        ['oauth_token' => $strToken,
                         'oauth_consumer_key' => $consumer_key,
                         'oauth_nonce' => $nonce,
                         'oauth_signature_method' => $method,
                         'oauth_signature' => $oauth_sign,
                         'oauth_timestamp' => $timestamp,
                         'status' => $strStatus,
                         'oauth_version' => $version], @header);

print $response->content;

7. To know if successful, you can print the response and it should be look like this.

{
    "geo":null,
    "created_at":"Mon Apr 26 23:45:50 +0000 2010",
    "in_reply_to_user_id":null,
    "truncated":false,
    "place":null,
    "source":"&lt;a href=\"http://dev.twitter.com\" rel=\"nofollow\"&gt;OAuth Dancer&lt;/a&gt;",
    "favorited":false,
    "in_reply_to_status_id":null,
    "contributors":null,
    "user":
    {
        "contributors_enabled":false,
        "created_at":"Wed Mar 07 22:23:19 +0000 2007",
        "description":"Reality Technician,
         Developer Advocate at Twitter,
         Invader from the Space.",
        "geo_enabled":true,
        "notifications":false,
        "profile_text_color":"000000",
        "following":false,
        "time_zone":"Pacific Time (US &amp; Canada)",
        "verified":false,
        "profile_link_color":"731673",
        "url":"http://bit.ly/5w7P88",
        "profile_background_image_url":"http://a3.twimg.com/profile_background_images/19651315/fiberoptics.jpg",
        "profile_sidebar_fill_color":"007ffe",
        "location":"San Francisco,
         CA",
        "followers_count":1220,
        "profile_image_url":"http://a3.twimg.com/profile_images/836683953/zod_normal.jpg",
        "profile_background_tile":true,
        "profile_sidebar_border_color":"bb0e79",
        "protected":false,
        "friends_count":1275,
        "screen_name":"episod",
        "name":"Taylor Singletary",
        "statuses_count":5733,
        "id":819797,
        "lang":"en",
        "utc_offset":-28800,
        "favourites_count":89,
        "profile_background_color":"000000"
    },
    "in_reply_to_screen_name":null,
    "coordinates":null,
    "id":12912397434,
    "text":"setting up my twitter \u79c1\u306e\u3055\u3048\u305a\u308a\u3092\u8a2d\u5b9a\u3059\u308b"
}


Please see the complete code below.

#!/usr/bin/perl

require LWP::UserAgent;

use strict;
use warnings;

use HTTP::Cookies;

use Digest::MD5 qw(md5 md5_hex md5_base64);
use Digest::SHA qw(sha1 sha1_hex sha1_base64 hmac_sha1 hmac_sha1_hex hmac_sha1_base64);

use POSIX qw(strftime);


my $lwpua = LWP::UserAgent->new;

my $uagent = "Mozilla/5.0 (Windows; U; Windows NT 5.1; en-US; rv:1.8.0.6) Gecko/20060728 Firefox/1.5.0.6";
my @header = ('Referer' => 'https://api.twitter.com/',
             'User-Agent' => $uagent,
             'Authorization' => 'OAuth');

# build signature base
my $strToken = "<your oauth access token>";
my $strSecret = "<your oauth access token secret>";
my $strStatus = "<your tweet>";

my $post_url = "http://api.twitter.com/1/statuses/update.json";
my $nonce = md5_base64(localtime()).md5_base64(localtime());
my $timestamp = strftime('%s', localtime);
my $method = "HMAC-SHA1";
my $version = "1.0";
my $consumer_key = "<your consumer key generated upon registration>";
my $consumer_secret = "<your consumer secret generated upon registration>";

my $post_urlenc = &urlencode($post_url);
my $status_enc = &urlencode($strStatus);
my $oauth_data = "oauth_consumer_key=$consumer_key&oauth_nonce=$nonce&oauth_signature_method=$method&oauth_timestamp=$timestamp&oauth_token=$strToken&oauth_version=$version&status=$status_enc";
my $oauth_dataenc = &urlencode($oauth_data);

my $sign_base = "POST&".$post_urlenc."&".$oauth_dataenc;
my $sign_key = $consumer_secret."&".$strSecret;

# oauth signature
my $oauth_sign = hmac_sha1_base64($sign_base, $sign_key)."=";

# post oauth request
my $response = $lwpua->post($post_url,
                        ['oauth_token' => $strToken,
                         'oauth_consumer_key' => $consumer_key,
                         'oauth_nonce' => $nonce,
                         'oauth_signature_method' => $method,
                         'oauth_signature' => $oauth_sign,
                         'oauth_timestamp' => $timestamp,
                         'status' => $strStatus,
                         'oauth_version' => $version], @header);

print $response->content;


1;

Monday, February 14, 2011

How to exchange a requested TOKEN for an access TOKEN from Twitter in PERL

Finally, we're here at the last part of OAuth process, exchanging the requested token for an access token. I assume you were able to follow my last 2 posts below.
To get an access token, we need the OAuth Token, and Verifier from the previous post.

Just follow the simple steps below to gain an access token which we will use to access Twitter API in users behalf. This is likely the same when requesting a token, the only difference are the parameters we pass on.

1. Install all the libraries you need.
  • LWP::UserAgent
  • HTTP::Cookies
  • Digest::MD5
  • Digest::SHA
  • POSIX

2. Initialize the libraries

require LWP::UserAgent;

use strict;
use warnings;

use HTTP::Cookies;

use Digest::MD5 qw(md5 md5_hex md5_base64);
use Digest::SHA qw(sha1 sha1_hex sha1_base64 hmac_sha1 hmac_sha1_hex hmac_sha1_base64);

use POSIX qw(strftime);

my $lwpua = LWP::UserAgent->new;

3. Setup the UserAgent and HTTP header with the name "Authorization" equal to "OAuth".

my $uagent = "Mozilla/5.0 (Windows; U; Windows NT 5.1; en-US; rv:1.8.0.6) Gecko/20060728 Firefox/1.5.0.6";
my @header = ('Referer' => 'https://api.twitter.com/',
             'User-Agent' => $uagent,
             'Authorization' => 'OAuth');

4. Build the signature base and signing key. Please take note that some parameters should be URL Encoded, see the post for the PERL function that you can use - URLENCODE sub function in PERL.

You need the consumer key and secret which was generated by Twitter upon registration.

You also need the Oauth Token and Verifier which you get when authorizing the requested token.

To generate NONCE, we use Digest::MD5::md5_base64() passing the localtime(). We do it twice to make it much UNIQUE.

Timestamp was generated by using POSIX::strftime() with date format UNIXTIME as "%s".

# build signature base
my $strToken = "<your oauth token>";
my $strVerifier = "<your oauth verifier>";

my $post_url = "https://api.twitter.com/oauth/access_token";
my $nonce = md5_base64(localtime()).md5_base64(localtime());
my $timestamp = strftime('%s', localtime);
my $method = "HMAC-SHA1";
my $version = "1.0";
my $consumer_key = "<your consumer key generated upon registration>";
my $consumer_secret = "<your consumer secret generated upon registration>";

my $post_urlenc = &urlencode($post_url);

my $oauth_data = "oauth_consumer_key=$consumer_key&oauth_nonce=$nonce&oauth_signature_method=$method&oauth_timestamp=$timestamp&oauth_token=$strToken&oauth_verifier=$strVerifier&oauth_version=$version";
my $oauth_dataenc = &urlencode($oauth_data);

my $sign_base = "POST&".$post_urlenc."&".$oauth_dataenc;
my $sign_key = $consumer_secret."&";

5. Generate the OAuth Signature using HMAC-SHA1 method.

my $oauth_sign = hmac_sha1_base64($sign_base, $sign_key)."=";

6. Post an OAuth request with all the parameters you passed on step #4.

my $response = $lwpua->post($post_url,
                        ['oauth_token' => $strToken,
                         'oauth_verifier' => $strVerifier,
                         'oauth_consumer_key' => $consumer_key,
                         'oauth_nonce' => $nonce,
                         'oauth_signature_method' => $method,
                         'oauth_signature' => $oauth_sign,
                         'oauth_timestamp' => $timestamp,
                         'oauth_version' => $version], @header);
my $form_data = $response->content;

7. Get the return value: oauth_token, oauth_token_secret, user_id, and screen_name

$form_data =~ s/\n//g;
$form_data =~ /^oauth_token=(.*?)&oauth_token_secret=(.*?)&user_id=(.*?)&screen_name=(.*?)\s*$/gi;

my $oauth_token = $1;
my $oauth_secret = $2;
my $user_id = $3;
my $screen_name = $4;


Hope you like it! Please see the complete code below. Thank you for reading.

#!/usr/bin/perl

require LWP::UserAgent;

use strict;
use warnings;

use HTTP::Cookies;

use Digest::MD5 qw(md5 md5_hex md5_base64);
use Digest::SHA qw(sha1 sha1_hex sha1_base64 hmac_sha1 hmac_sha1_hex hmac_sha1_base64);

use POSIX qw(strftime);


my $lwpua = LWP::UserAgent->new;

my $uagent = "Mozilla/5.0 (Windows; U; Windows NT 5.1; en-US; rv:1.8.0.6) Gecko/20060728 Firefox/1.5.0.6";
my @header = ('Referer' => 'https://api.twitter.com/',
             'User-Agent' => $uagent,
             'Authorization' => 'OAuth');

# build signature base
my $strToken = "<your oauth token>";
my $strVerifier = "<your oauth verifier>";

my $post_url = "https://api.twitter.com/oauth/access_token";
my $nonce = md5_base64(localtime()).md5_base64(localtime());
my $timestamp = strftime('%s', localtime);
my $method = "HMAC-SHA1";
my $version = "1.0";
my $consumer_key = "<your consumer key generated upon registration>";
my $consumer_secret = "<your consumer secret generated upon registration>";

my $post_urlenc = &urlencode($post_url);
my $oauth_data = "oauth_consumer_key=$consumer_key&oauth_nonce=$nonce&oauth_signature_method=$method&oauth_timestamp=$timestamp&oauth_token=$strToken&oauth_verifier=$strVerifier&oauth_version=$version";
my $oauth_dataenc = &urlencode($oauth_data);

my $sign_base = "POST&".$post_urlenc."&".$oauth_dataenc;
my $sign_key = $consumer_secret."&";

  # oauth signature
my $oauth_sign = hmac_sha1_base64($sign_base, $sign_key)."=";

# post oauth request
my $response = $lwpua->post($post_url,
                        ['oauth_token' => $strToken,
                         'oauth_verifier' => $strVerifier,
                         'oauth_consumer_key' => $consumer_key,
                         'oauth_nonce' => $nonce,
                         'oauth_signature_method' => $method,
                         'oauth_signature' => $oauth_sign,
                         'oauth_timestamp' => $timestamp,
                         'oauth_version' => $version], @header);
my $form_data = $response->content;

$form_data =~ s/\n//g;
$form_data =~ /^oauth_token=(.*?)&oauth_token_secret=(.*?)&user_id=(.*?)&screen_name=(.*?)\s*$/gi;

my $oauth_token = $1;
my $oauth_secret = $2;
my $user_id = $3;
my $screen_name = $4;

print "$oauth_token|$oauth_secret|$user_id|$screen_name\n";
print "done!";


sub urlencode
{
  my ($url) = @_;

  $url =~ s/([^A-Za-z0-9_.-])/sprintf("%%%02X", ord($1))/seg;
  return $url;
}


1;

How to authorize OAuth TOKEN from Twitter in PERL

I assume you read my previous post - How to request OAuth TOKEN from Twitter in PERL before reading this post. You need the OAuth Token and Secret to proceed to this process.

On this post, we will login to twitter via back-end, please see post - Login to Twitter via backend using PERL on how to do it. Once the user had been logged in, we will authorize our application to post tweet and access users information in users behalf.

This post will outputted an OAuth Token and Verifier which you will use to Access Token "final oauth process" to get the OAuth Token and OAuth Secret.

Follow the simple steps below to authorize your application.

1. Install the following libraries.
  • LWP::UserAgent
  • HTTP::Cookies

2. Initialize the libraries.

require LWP::UserAgent;
use HTTP::Cookies;
my $lwpua = LWP::UserAgent->new;

3. Setup UserAgent, HTTP Header, and Cookies.

my $uagent = "Mozilla/5.0 (Windows; U; Windows NT 5.1; en-US; rv:1.8.0.6) Gecko/20060728 Firefox/1.5.0.6";
my @header = ('Referer' => 'https://api.twitter.com/',
             'User-Agent' => $uagent);

my $cookie_file = "/home/wapps/tweext/cookies/twitter/cookies.$intMsisdn.dat";
my $cookie_jar = HTTP::Cookies->new(
                file => $cookie_file,
                autosave => 1,
                ignore_discard => 1);

my $lwpua->cookie_jar($cookie_jar);

4. Post the OAuth Token with Username and Password to authorize URL - https://api.twitter.com/oauth/authorize

my $strToken = "<your oauth token>";
my $strUser = "<your twitter username>";
my $strPass = "<your twitter password>";

my $response = $lwpua->post("https://api.twitter.com/oauth/authorize",
                          ['oauth_token' => $strToken,
                           'session[username_or_email]' => $strUser,
                           'session[password]' => $strPass], @header);
my $cookie_jar->extract_cookies( $response );
my $cookie_jar->save;

$form_data = $response->content;

5. Get the OAuth Token and Oauth Verifier from the output returned by step #4.

$form_data =~ s/\n//g;
$form_data =~ /meta http-equiv="refresh" content="0;url=(.*?)\?oauth_token=(.*?)&oauth_verifier=(.*?)"/ig;

my $oauth_token = $2;
my $oauth_verif = $3;

unlink($cookie_file);


1;


Please see the complete code below. Thank you for reading this post.

#!/usr/bin/perl

require LWP::UserAgent;

use strict;
use warnings;

use HTTP::Cookies;

my $lwpua = LWP::UserAgent->new;

my $uagent = "Mozilla/5.0 (Windows; U; Windows NT 5.1; en-US; rv:1.8.0.6) Gecko/20060728 Firefox/1.5.0.6";
my @header = ('Referer' => 'https://api.twitter.com/',
             'User-Agent' => $uagent);

my $cookie_file = "/home/wapps/tweext/cookies/twitter/cookies.$intMsisdn.dat";
my $cookie_jar = HTTP::Cookies->new(
                file => $cookie_file,
                autosave => 1,
                ignore_discard => 1);

my $lwpua->cookie_jar($cookie_jar);

my $strToken = "<your oauth token>";
my $strUser = "<your twitter username>";
my $strPass = "<your twitter password>";

my $response = $lwpua->post("https://api.twitter.com/oauth/authorize",
                          ['oauth_token' => $strToken,
                           'session[username_or_email]' => $strUser,
                           'session[password]' => $strPass], @header);
my $cookie_jar->extract_cookies( $response );
my $cookie_jar->save;

$form_data = $response->content;

$form_data =~ s/\n//g;
$form_data =~ /meta http-equiv="refresh" content="0;url=(.*?)\?oauth_token=(.*?)&oauth_verifier=(.*?)"/ig;

my $oauth_token = $2;
my $oauth_verif = $3;

unlink($cookie_file);


1;

Sunday, February 13, 2011

How to request OAuth TOKEN from Twitter in PERL

For us to be able to request for a token, the first thing you have to do is to register your application.

To register an app, access the Client Applications page of Twitter. Registering your application allows twitter to identify your application. Remember not to reveal your consumer secrets with anyone.

While creating an application, you will be asked whether your application is a client or browser application, choose browser for this post.


Client applications need not to enter a callback URL. In fact, web applications need not to supply a callback URL either, but as best practice, you should submit your oauth_callback_url on every token request, explicitly declaring what you want the callback to be. This will also be needed to identify the variables we need since we're doing it backend.

You will also be asked for an access type, choose "read and write" for you to be able to post tweet eventually.


After registering your application, you will have the 2 important details below.
  • Consumer Key
  • Consumer Secret
Once you have those details, we are now ready to do the coding part. Just follow the simple steps below and you will be able to retrieve a token from Twitter.

Please take note that this token is not yet ready to access twitter on users behalf. The returned token by this process will be use to AUTHORIZE "next to this oauth process" and ACCESS TOKEN "final oauth process".

1. Install the libraries you need.
  • LWP::UserAgent
  • HTTP::Cookies
  • Digest::MD5
  • Digest::SHA
  • POSIX

2. Initialize the following libraries.

require LWP::UserAgent;

use HTTP::Cookies;

use Digest::MD5 qw(md5 md5_hex md5_base64);
use Digest::SHA qw(sha1 sha1_hex sha1_base64 hmac_sha1 hmac_sha1_hex hmac_sha1_base64);

use POSIX qw(strftime);

my $lwpua = LWP::UserAgent->new;

3. Setup the UserAgent and HTTP header with the name "Authorization" equal to "OAuth".

my $uagent = "Mozilla/5.0 (Windows; U; Windows NT 5.1; en-US; rv:1.8.0.6) Gecko/20060728 Firefox/1.5.0.6";
my @header = ('Referer' => 'https://api.twitter.com/',
             'User-Agent' => $uagent,
             'Authorization' => 'OAuth');

4. Build the signature base and signing key. Please take note that some parameters should be URL Encoded, see the post for the PERL function that you can use - URLENCODE sub function in PERL.

You need the callback URL which you define during client registration, and the consumer key and secret which was generated by Twitter upon registration.

To generate NONCE, we use Digest::MD5::md5_base64() passing the localtime(). We do it twice to make it much UNIQUE.

Timestamp was generated by using POSIX::strftime() with date format UNIXTIME as "%s".

my $post_url = "https://api.twitter.com/oauth/request_token";
my $callback_url = "<your callback url define on client registration>";
my $nonce = md5_base64(localtime()).md5_base64(localtime());
my $timestamp = strftime('%s', localtime);
my $method = "HMAC-SHA1";
my $version = "1.0";
my $consumer_key = "<your consumer key generated upon registration>";
my $consumer_secret = "<your consumer secret generated upon registration>";

my $callback_urlenc = &urlencode($callback_url);
my $post_urlenc = &urlencode($post_url);

my $oauth_data = "oauth_callback=$callback_urlenc&oauth_consumer_key=$consumer_key&oauth_nonce=$nonce&oauth_signature_method=$method&oauth_timestamp=$timestamp&oauth_version=$version";
my $oauth_dataenc = &urlencode($oauth_data);

my $sign_base = "POST&".$post_urlenc."&".$oauth_dataenc;
my $sign_key = $consumer_secret."&";

5. Generate the OAuth Signature using HMAC-SHA1 method.

my $oauth_sign = hmac_sha1_base64($sign_base, $sign_key)."=";

6. Post an OAuth request with all the parameters you passed on step #4.

my $response = $lwpua->post($post_url,
                        ['oauth_callback' => $callback_url,
                         'oauth_consumer_key' => $consumer_key,
                         'oauth_nonce' => $nonce,
                         'oauth_signature_method' => $method,
                         'oauth_signature' => $oauth_sign,
                         'oauth_timestamp' => $timestamp,
                         'oauth_version' => $version], @header);
my $form_data = $response->content;

7. Get the return value: oauth_token, oauth_token_secret, and oauth_callback_confirmed

$form_data =~ s/\n//g;
$form_data =~ /^oauth_token=(.*?)&oauth_token_secret=(.*?)&oauth_callback_confirmed=(.*?)\s*$/gi;

my $oauth_token = $1;
my $oauth_secret = $2;
my $oauth_confirm = $3;


Hope you like it!! Please see the complete code below.

#!/usr/bin/perl

require LWP::UserAgent;

use strict;
use warnings;

use HTTP::Cookies;

use Digest::MD5 qw(md5 md5_hex md5_base64);
use Digest::SHA qw(sha1 sha1_hex sha1_base64 hmac_sha1 hmac_sha1_hex hmac_sha1_base64);

use POSIX qw(strftime);

my $lwpua = LWP::UserAgent->new;

my $uagent = "Mozilla/5.0 (Windows; U; Windows NT 5.1; en-US; rv:1.8.0.6) Gecko/20060728 Firefox/1.5.0.6";
my @header = ('Referer' => 'https://api.twitter.com/',
             'User-Agent' => $uagent,
             'Authorization' => 'OAuth');

# build the signature base
my $post_url = "https://api.twitter.com/oauth/request_token";
my $callback_url = "http://flusso1.wolfpac.net/tweext/twitter.php";
my $nonce = md5_base64(localtime()).md5_base64(localtime());
my $timestamp = strftime('%s', localtime);
my $method = "HMAC-SHA1";
my $version = "1.0";
my $consumer_key = "fy13RaNud7FQl1AVafzq9g";
my $consumer_secret = "3FHgsf5ychPlLPaDF7f1RRjJthU5rPMCPa9kpJbbpK4";

my $callback_urlenc = &urlencode($callback_url);
my $post_urlenc = &urlencode($post_url);

my $oauth_data = "oauth_callback=$callback_urlenc&oauth_consumer_key=$consumer_key&oauth_nonce=$nonce&oauth_signature_method=$method&oauth_timestamp=$timestamp&oauth_version=$version";
my $oauth_dataenc = &urlencode($oauth_data);

my $sign_base = "POST&".$post_urlenc."&".$oauth_dataenc;
my $sign_key = $consumer_secret."&";

# oauth signature
my $oauth_sign = hmac_sha1_base64($sign_base, $sign_key)."=";

# post oauth request
my $response = $lwpua->post($post_url,
                        ['oauth_callback' => $callback_url,
                         'oauth_consumer_key' => $consumer_key,
                         'oauth_nonce' => $nonce,
                         'oauth_signature_method' => $method,
                         'oauth_signature' => $oauth_sign,
                         'oauth_timestamp' => $timestamp,
                         'oauth_version' => $version], @header);
my $form_data = $response->content;

$form_data =~ s/\n//g;
$form_data =~ /^oauth_token=(.*?)&oauth_token_secret=(.*?)&oauth_callback_confirmed=(.*?)\s*$/gi;

my $oauth_token = $1;
my $oauth_secret = $2;
my $oauth_confirm = $3;

print "$oauth_token|$oauth_secret|$oauth_confirm\n";
print "done!";

sub urlencode
{
  my ($url) = @_;

  $url =~ s/([^A-Za-z0-9_.-])/sprintf("%%%02X", ord($1))/seg;
  return $url;
}


1;

Friday, February 11, 2011

URLENCODE sub function in PERL

This is how you do the url encoding in PERL, a useful function in PHP to encode URL string. 

#!/usr/bin/perl

sub urlencode
{
  my ($url) = @_;

  $url =~ s/([^A-Za-z0-9_.-])/sprintf("%%%02X", ord($1))/seg;
  return $url;
}


1;

Login to twitter via backend using PERL

This is the same from the last post - Login to foursquare via backend using PERL but this time, we're doing it for twitter. Just follow the 4 simple steps below.

1. Install the libraries into your server.
  • LWP::UserAgent;
  • HTTP::Cookies;
2. Initialize the libraries UserAgent and Cookies.

my $lwpua = LWP::UserAgent->new;

my $user_agent = "Mozilla/5.0 (Windows; U; Windows NT 5.1; en-US; rv:1.8.0.6) Gecko/20060728 Firefox/1.5.0.6";
my @header = ('Referer' => 'http://m.twitter.com',
             'User-Agent' => $user_agent);

my $cookie_file = "cookies.dat";
my $cookie_jar = HTTP::Cookies->new(
                file => $cookie_file,
                autosave => 1,
                ignore_discard => 1);

$lwpua->cookie_jar($cookie_jar);

3. Post your username and password to https://mobile.twitter.com/session and save the cookies.

my $strUser = '<your twitter username>';
my $strPass = '<your twitter password>';

# log-in to twitter
$response = $lwpua->post('https://mobile.twitter.com/session',
                            ['username' => $strUser,
                             'password' => $strPass,
                             'authenticity_token' => $auth_token], @header);

$cookie_jar->extract_cookies( $response );
$cookie_jar->save;

4. You can check if successful or not by accessing https://mobile.twitter.com via GET and print the content.

$response = $lwpua->get('https://mobile.twitter.com', @header);
$form_data = $response->content;

print "$form_data\n\ndone!";


That's it! Please see the complete code below.

#!/usr/bin/perl

require LWP::UserAgent;

use strict;
use warnings;

use HTTP::Cookies;

my $lwpua = LWP::UserAgent->new;

my $user_agent = "Mozilla/5.0 (Windows; U; Windows NT 5.1; en-US; rv:1.8.0.6) Gecko/20060728 Firefox/1.5.0.6";
my @header = ('Referer' => 'http://m.twitter.com',
             'User-Agent' => $user_agent);

my $cookie_file = "cookies.dat";
my $cookie_jar = HTTP::Cookies->new(
                file => $cookie_file,
                autosave => 1,
                ignore_discard => 1);

$lwpua->cookie_jar($cookie_jar);

# getting authenticity token
my $response = $lwpua->get('https://mobile.twitter.com/session/new', @header);
my $form_data = $response->content;

$form_data =~ s/\n//g;
$form_data =~ /input name="authenticity_token" type="hidden" value="(.*?)"/ig;

my $auth_token = $1;

my $strUser = '<your twitter username>';
my $strPass = '<your twitter password>';

# log-in to twitter
$response = $lwpua->post('https://mobile.twitter.com/session',
                            ['username' => $strUser,
                             'password' => $strPass,
                             'authenticity_token' => $auth_token], @header);

$cookie_jar->extract_cookies( $response );
$cookie_jar->save;

$response = $lwpua->get('https://mobile.twitter.com', @header);
$form_data = $response->content;

print "$form_data\n\ndone!";


1;


Hope you like it!! Thank you for reading.

Thursday, February 10, 2011

Login to foursquare via backend using PERL

This is just a simple login request to foursquare via backend using PERL. Just follow the simple steps and the complete code below.

1. Install the libraries needed.
  • LWP::UserAgent;
  • HTTP::Cookies;
2. Initialize UserAgent and Cookies.

my $lwpua = LWP::UserAgent->new;

my $user_agent = "Mozilla/5.0 (Windows; U; Windows NT 5.1; en-US; rv:1.8.0.6) Gecko/20060728 Firefox/1.5.0.6";
my @header = ('Referer' => 'http://foursquare.com',
             'User-Agent' => $user_agent);

my $cookie_file = "cookies.dat";
my $cookie_jar = HTTP::Cookies->new(
                file => $cookie_file,
                autosave => 1,
                ignore_discard => 1);

$lwpua->cookie_jar($cookie_jar);

3. Post your username and password to https://foursquare.com/mobile/login and save the cookies.

my $strUser = "<your foursquare username>";
my $strPass = "<your foursquare password>";

# log-in to foursquare
my $response = $lwpua->post('https://foursquare.com/mobile/login',
                      ['username' => $strUser,
                       'password' => $strPass], @header);
$cookie_jar->extract_cookies( $response );
$cookie_jar->save;

4. You can check if successful or not by accessing http://foursquare.com/mobile/ via GET and print the content.

$response = $lwpua->get("http://foursquare.com/mobile/", @header);
my $form_data = $response->content;

print "$form_data\n\ndone!";


That's it! So simple right? Please see the complete code below.

#!/usr/bin/perl

require LWP::UserAgent;

use strict;
use warnings;

use HTTP::Cookies;

my $lwpua = LWP::UserAgent->new;

my $user_agent = "Mozilla/5.0 (Windows; U; Windows NT 5.1; en-US; rv:1.8.0.6) Gecko/20060728 Firefox/1.5.0.6";
my @header = ('Referer' => 'http://foursquare.com',
             'User-Agent' => $user_agent);

my $cookie_file = "cookies.dat";
my $cookie_jar = HTTP::Cookies->new(
                file => $cookie_file,
                autosave => 1,
                ignore_discard => 1);

$lwpua->cookie_jar($cookie_jar);

my $strUser = "<your foursquare username>";
my $strPass = "<your foursquare password>";

# log-in to foursquare
my $response = $lwpua->post('https://foursquare.com/mobile/login',
                      ['username' => $strUser,
                       'password' => $strPass], @header);
$cookie_jar->extract_cookies( $response );
$cookie_jar->save;

$response = $lwpua->get("http://foursquare.com/mobile/", @header);
my $form_data = $response->content;

print "$form_data\n\ndone!";


1;


Hope you like it!! Thank you for reading. Please see other post - Login to twitter via backend using PERL

Wednesday, February 9, 2011

How to make a form post request in jQuery

Download the latest jQuery http://code.jquery.com/jquery-1.4.4.min.js save that in your server, set it as your source file, then call the method $.ajax() with parameters as follows:
  • URL as your form action
  • TYPE as your form method
  • DATA as your input parameters.
You can also set the callback function for successful and error transactions.

<script type="text/javascript" src="http://domain.url.com/jquery-1.4.4.min.js"></script>
<script type="text/javascript">
        function form_post() {
                $.ajax({
                        url : 'http://domain.url.com/form.php',
                        type: 'post',
                        data: {'param1' : 'param1_value', 'param2' : 'param2_value'},
                        success: function(data){
                                alert(data);
                        },
                        error: function(data){
                                alert(data);
                        }
                });
        }
</script>

STRIPSLASHES sub function in PERL

Here's a simple PERL function with REGEX implementation to do stripslashes (a PHP function).

#!/usr/bin/perl

sub stripslashes
{
   my ($string) = @_;

   $string =~ s/\\(\'|\"|\\)/$1/g;
   return $string;
}


1;

Thursday, February 3, 2011

How to create a file transfer script via FTP in PERL

For you to be able to do a file transfer from your server to destination server, your server should be able to establish connection to destination server.

You only need the 4 details from the destination server:
  • Destination Server IP
  • Destination Port where you are connected into (by default is 22)
  • FTP Account Username
  • FTP Account Password.

Lets assume you have now the credentials and your server is allowed to connect to destination server via the IP and Port provided. We can now develop the script that will transfer files from your server to destination server.

Just follow the simple steps below with the complete code at the end for your reference.

1. We need the FTP library to be installed in your server.
  • Net::FTP 
2. Once installed, initialize Net::FTP by passing the [DESTINATION SERVER IP] and [DESTINATION SERVER PORT]. Save it to an object variable say $ftp, this is for you to be able to call the methods available for your script.

$ftp = Net::FTP->new([DESTINATION SERVER IP],Port=>[DESTINATION SERVER PORT]);

3. You can also get the return message or status of every object call by calling $object->message. The $object is the return object on step #2.

$ftp->message;

4. Submit the login credentials by calling $object->login(<username>, <password>).

$ftp->login([USERNAME], [PASSWORD]);

5. If successful, you can change or create your destination working directory by executing $object->cwd(<directory>) or $object->mkdir(<directory>).

$ftp->cwd($ftp_dir) or $ftp->mkdir($ftp_dir);

6. If your okay with your working directory, you can now transfer files from your server to destination server by calling $object->put(<source file>, <destination file>).

$ftp->put("[FILEPATH AND FILENAME OF SOURCE SERVER]", "[FILENAME OF DESTINATION SERVER]");

7. Then close the connection by calling $object->quit.

$ftp->quit;


That's it!! Hope you were able to follow the 7 simple steps above. You can also get the complete code with added functionality to support temporary files and renaming. Please see below.

#!/usr/bin/perl

use Net::FTP;

$ftp_ip = "<your destination ip>";
$ftp_port = "<your destination port>";
$ftp_user = "<your ftp account username>";
$ftp_pass = "<your ftp account password>";
$ftp_dir = "<your destination working directory>";

$ftp_src_file = "<your source file to be transfered include the full source path>";

$ftp_dest_file_temp = "<your temporary destination filename>";
$ftp_dest_file_good = "<your final destination filename>";

# create new instance
$ftp = Net::FTP->new($ftp_ip,Port=>$ftp_port) || die "ERROR: Unable to connect to host [$ftp_ip:$ftp_port]";
var_dump($ftp->message);

# login
$ftp->login($ftp_user, $ftp_pass) || die "ERROR: Unable to login [$ftp_user]";
var_dump($ftp->message);

# change working directory
$ftp->cwd($ftp_dir) or $ftp->mkdir($ftp_dir);
var_dump($ftp->message);

# transfer files
$ftp->put("$ftp_src_file", "$ftp_dest_file_temp") || die "ERROR: Transfer failed!",$ftp->message;
var_dump($ftp->message);

# rename files
$ftp->rename("$ftp_dest_file_temp", "$ftp_dest_file_good") || die "ERROR: Rename Failed!",$ftp->message;
var_dump($ftp->message);

# closing the ftp connection
$ftp->quit;

echo "done!";

1;

Wednesday, February 2, 2011

The TOP 10 FREE eCommerce Software for your business needs.

Many people loves FREE stuff, actually all of us loves FREE stuff, and the other thing that many businessmen loves and very thankful of are the FREE software for their business needs.

eCommerce solution is a huge investment for businessmen and since we have now an open-source software available for us, we can cut it out and just do business.

Here I listed below are the 10 of the best open-source eCommerce software that you can use for your online shops and with a simple tweak to the codes you can redesign your site to meet your preference. If you are now worried on buying a software to modify the codes, not to worries, because open-source software also uses open-source development programming language, which is also available for FREE on the net. Hope you like this post!!

The TOP 10 FREE eCommerce Software:
  • osCommerce osCommerce stands for “open source Commerce”. It is written in PHP and has a GNU general public license. Any server with PHP and MySQL installed can make use of osCommerce. osCommerce is widely regarded as the best free open source e-commerce software. It is used by a huge number of people and is known to provide strong web applications so much, so that other competitor softwares use parts of osCommerce. I personally recommend this software if you will build your site from ground.
  • Zen Cart Zen Cart is written in PHP as well and has a GNU general public license. Zen Cart works with MySQL database and HTML modules. Help and troubleshooting is available in many languages. Zen Cart was derived from osCommerce and apart from the looks; Zen Cart’s architecture has seen a major change from osCommerce. There are newly added functionalities like Gift Certificates, Coupons and Vouchers. Selling downloadable files also has been made possible with Zen Cart.
  • PrestaShop PrestaShop is written in PHP and comes under the OSL (Open Software License) version 3 license. Igor Schlumberger and Bruno Lévêque of Paris started PrestaShop.
    It makes use of the Ajax interface and is considered to be easier and more efficient as compared to Magento.
  • OpenCart OpenCart is written in PHP and has a GNU general public license. It is known to have a very easy and clean interface that looks great. It has a lot of features and a search engine friendly which is one of its advantage.
  • Magento Magento is written in PHP and has an OSL version 3 and AFL (Academic Free License) version 3 license. Varien built Magento by further developing the Zend Framework. Magento is considered to be the hottest new ecommerce software is growing very fast on the internet. It has a lot of features that can be considered “enterprise grade” as compared to “web grade”. Magento gives merchants a higher level of control on settings and customizations for user experience, content and features provided by their online shops.
  • StoreSprite StoreSprite is written in PHP and has a Freeware License which makes it free to be downloaded, installed and used. Its most important feature is the simple scripting.
  • AgoraCart AgoraCart allows for integration of existing web design as well as use of pre-defined templates. It provides flexibility of design through use of CSS. The developers have also created AgoraScript as their own scripting language.
  • X-Cart X-Cart is written in PHP and is known to have great ease of modification. It uses MySQL database and provides CSS layout. Store owners can also attach Meta tags to make their stores appear better in search engines.
  • Ubercart Ubercart is written in PHP and has a GNU general public license. It requires PHP and MySQL to work and is available as a plugin for Drupal. Drupal is also a FREE framework software same as Wordpress. I recommend Ubercart if your web site is running under Drupal framework
  • WP e-commerce
    Wordpress, the popular blog and CMS site also provides its own ecommerce shopping cart – "WP e-commerce". It is the easy and fully featured shopping cart plugin of choice for Wordpress users. I recommend this plugin for web site which uses Wordpress as their framework.

Please leave a comment if you like it!! Thank you for reading this post.

Tuesday, February 1, 2011

Why do technical people get paid more?

Maybe your thinking why do technical people get paid more than others, but before that, we have to know first some of the facts, surveys and studies conducted in the U.S.

Research shows that Business and technology and management in which technical people belong are next to Medical and dental as highest paid professions.

The 2004 United States Department of Labor, Bureau of Statics' Occupational Survey revealed the 25 highest paid professions fall into five categories:
  • Medical and dental
  • Business and technology and management
  • Airline and space
  • Law
  • Engineering and science

Source: wisegeek.com

Medical and dental specialists top the list of the highest paid professions, as they hold numbers one through eight of the 25 highest earning jobs as well as five other rankings on the 2004 list. Anesthesiologists are number one, internists number two and obstetricians and gynecologists number three of the top professional earners in the United States. Oral surgeons take the fourth spot, orthodontists the fifth and prosthodontists the sixth. Psychiatrists are listed as the seventh of the highest paid professions, while surgeons are ranked as the eighth. The average 2004 income for these eight professions is more than $145,600 US dollars (USD).

Family and general physicians, with their average annual 2004 salary listed at $137,090 USD, place tenth on the Survey. Pediatricians, at an average income of $135,730 USD in 2004, are ranked eleventh. Thirteenth on the list of the highest paid professions are dentists, with an average annual 2004 salary of $125,060 USD, while podiatrists are ranked eighteenth with an average income of $94,400 in 2004. According to the Survey, optometrists, with an average salary of $88,410 in 2004, are the twenty-third highest paid professionals in the United States.

Business and technology management professions occupy three of the 25 highest paid professions listed on the Occupational Statistics Survey. Chief Executive Officers (CEOs), with an average annual salary of $140,350 USD in 2004, rank as the ninth highest paid professionals. Computer and Information Technology (IT) managers rank as the twentieth highest earning professionals with an average 2004 income of $92,570 USD. Marketing managers, with average 2004 earnings of $87,640 USD, are ranked twenty-fourth out of the 25 highest paid professions on the Survey.

Airline and space industry jobs are listed as the twelfth, fourteenth and sixteenth highest paid professions in the United States. Airline pilots, copilots and airline engineers earn about $129,250 USD, according to the 2004 statistics. The 2004 average salary of air traffic controllers is about $102,030 USD per year, while astronomers earned an average of $97,320 USD in 2004.

Law-related professions rank seventeenth and nineteenth on the 2004 Occupational Statistics Survey. The average 2004 salary of lawyers is listed as $94,930 USD. Judges and magistrates earn an average of $93,070 USD, according to the 2004 Survey.

Engineering and science professions account for four of the 25 highest paid professions listed on the 2004 Survey. Engineering managers, with an average 2004 annual salary of $97,630 USD, rank as the fifteenth highest earning professionals. Natural Science managers are ranked at the twenty-first highest paid professionals at an average income of $88,660 USD in 2004. Petroleum engineers are listed at number twenty-two on the list due to the findings of their average income at $88,500 USD in 2004. A physicist, with an average annual 2004 salary of $87,450 USD, is the twenty-fifth highest earning professional of the 25 highest paid professions on the 2004 Survey.

Forbes Magazine: America's 25 Best-Paying Jobs 2009
Listed with average annual pay

1. Surgeons: $206,770
2. Anesthesiologists: $197,570
3. Orthodontists: $194,930
4. Obstetrician and Gynecologists: $192,780
5. Oral and Maxillofacial Surgeons: $190,420
6. Internists: $176,740
7. Prosthodontists: $169,810
8. Physicians: $165,000
9. Family and General Practitioners: $161,490
10. CEOs: $160,440
11. Dentists: $154,270
12. Psychiatrists: $154,050
13. Pediatricians: $153,370
14. Specialist Dentists: $142,070
15. Podiatrists: $125,760
16. Lawyers: $124,750
17. Natural Sciences Managers: $123,140
18. Engineering Managers: $120,580
19. Pilots: $119,750
20. Petroleum Engineers: $119,140
21. Computer and Information Systems Managers: $118,710
22. Marketing Managers: $118,160
23. Financial Managers: $110,640
24. Sales Managers: $110,390
25. Air Traffic Controllers: $108,090

CNBC Highest Paying Jobs 2010
Listed with average annual salary (source: U.S. Bureau of Labor Statistics)

1. Surgeons: $219,770
2. Anesthesiologists: $211,750
3. Oral & Maxillofacial Surgeons: $210,710
4. Orthodontists: $206,190
5. Obstetricians & Gynecologists: $204,470
6. Internists: $183,990
7. Physicians & Surgeons: $173,860
8. Family and general practitioners: $168,550
9. Chief Executive Officer (CEO): $167,280
10. Psychiatrists: $163,660
11. Pediatricians: $161,410
12. Dental Generalist: $153,570
13. Dental Specialist: $153,570
14. Podiatrists: $131,730
15. Lawyers: $129,020
16. Natural Sciences Managers: $127,000
17. Prosthodontists: $125,400
18. Engineering Managers: $122,810
19. Computer and Information Systems Managers: $120,640
20. Marketing Managers: $120,070

In my own opinion, listed below are some of the factors which I think why technical people get paid with a much higher salary.
  • Technical people always up to date with the latest technology.
  • They are continuous in learning and research for new technology.
  • They find new ways to make the impossible possible.
  • Technical people doesn't recite solutions to the problems, they resolve it by their own strategy.
  • They are not a normal people that do what was written in text books, they create their own solution and take note of it as a learning experience.
  • They are with higher IQ's and best in problem solving. The GEEK people.

Leadership 101


  • Leadership demands sacrifices for the near-term to receive lasting benefits. the longer we wait to make sacrifices, the harder they become. Successful people make important decisions early in their life, then manage those decisions the rest of their lives.
  • Growth does not happen by chance. If you want to be sure to grow, you need a plan something strategic, specific, and scheduled. it's a discipline that would need incredible determination from us.
  • Success comes by going the extra mile, working the extra hours, and investing the extra time. The same is true for us. If we want to get to excel in any segment of life, a little extra effort can help. Our efforts can go a long way if we only work a little smarter, listen a little better, push a little harder, and persevere a little longer.
  • Making a difference in your work is not about productivity; it's about people. When you focus on others and connect with them, you can work together to accomplish great things.
  • Envision a goal you'd like to reach. Make it big enough to scare you a little. Now write down a plan for moving toward it. Create mini-goals within the big goal, to set yourself up for continual progress. And include some risks, too. Set yourself up for success.
  • Leaders build margins, not image. A leader may be forced to take unpopular stands for the good of the company. Popularity isn't bad, but decisions made solely on the basis of popular opinion can be devastating. So take courage and make the right though sometimes painful choices.